When you bought a domain name, you’ll need to update the domain’s nameservers to point it to your hosting provider.
While the process is the same for the most domain name registrars, each of them has its own web interface for you to do just that.
In this post, I am going to show you how to change your Namecheap nameservers.
What is DNS?
First all, you might be wondering, what’s DNS?
Domain Name System or DNS is the phonebook of the internet, according to Cloudflare. DNS is responsible for translating a domain name to IP address so the web browser can load all the resources.
Nameserver, on the other hand, is a server specialized in handling request regarding domain’s location. It maps the domain name to the web hosting location. As simple as it sounds, Nameservers are a fundamental part of the Domain Name System (DNS).
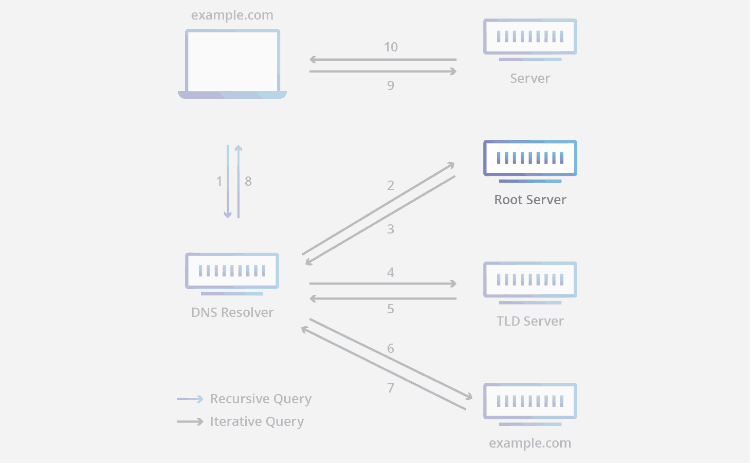
If Domain Name System is the phonebook, nameservers are the address.
Namecheap’s Dashboard is Your Control Panel
What I like about the Namecheap’s dashboard as compared to other domain registrars is that it doesn’t clutter the information.
When you log in to your Namecheap account, you’ll see a list of products you have with Namecheap. Clicking the arrow would give you more details information for that product apart from its expiration date.
To change a domain’s nameservers, click on “Manage”.
Changing Your Domain’s Nameservers
By default, NameCheap would assign its own BasicDNS as your domain’s default nameservers. If you signed for a web hosting plan with NameCheap, you can select “Namecheap Web Hosting DNS”, otherwise you should choose Custom DNS.
For example, as I host my websites on Google Cloud, I should log in to my Google Cloud account to get the nameservers.

Copy those nameservers onto the Custom DNS section in Namecheap.
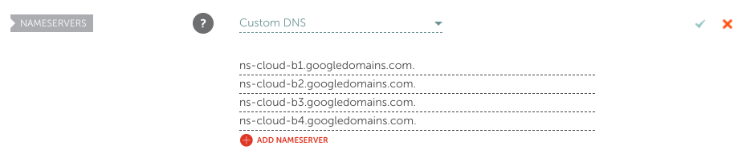
Click the green arrow when you’re done and Namecheap will start propagating the new nameservers.
If you’ve set up Cloudflare for your website, you should use Cloudflare’s nameservers to take the advantages Cloudflare provides to speed up your website.
Log in to your Cloudflare account and click “DNS”. You should see Cloudflare’s nameservers as you scroll down the page.

Refer to your web hosting provider for the correct name server addresses. Wrong name server would make your website inaccessible.
Once you change your domain name server, you’ll need to add your domain in your hosting provider.
Domain Name System (DNS) Propagation Takes Time
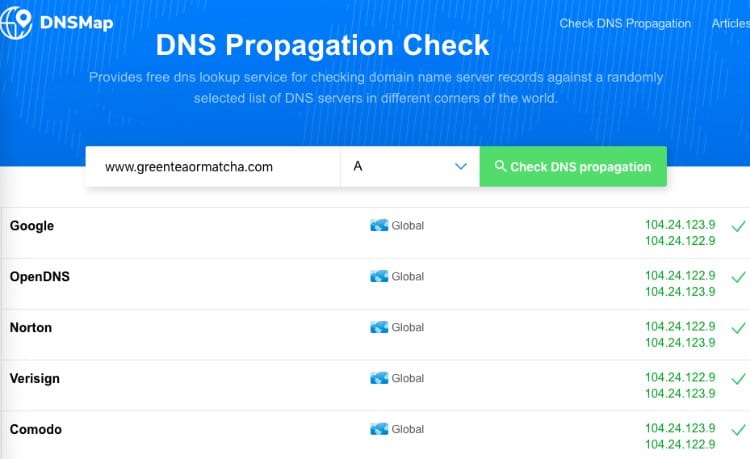
After you successfully changed your domain name servers, don’t expect to be able to view your website directly. It usually takes up to 24 – 48 hours for changes to domain name system to fully propagate globally. However, there are free services you could use to check the status of your domain propagation.
Simply use any of the services above and key in your domain to see the status. Check out the screenshot below for the status of GreenTeaMatcha domain that I updated a while back.
Final Thoughts
Updating your Nameservers is a straightforward process. Don’t forget to add your domain in your hosting provider once you updated your nameservers. Failure to do so might cause your website to be inaccessible.
If you enjoyed this post, I’d be grateful if you’d help share it on Twitter or Facebook. Thank you!