If you’re wondering what’s the best WP Rocket settings for your WordPress site, this guide is for you.
I’ve set up WP Rocket on multiple websites and super happy with the result. On one of my websites, I managed to reduce the page load time by more than 50%.
I found the settings that work best for my websites and I’m gonna share it with you today.
Let’s dive into it.
Disclaimer: Some of the links below are affiliate links, meaning if you choose to buy them, I will earn a commission at no extra cost to you. Please know that I have experience with all of the following resources and I recommend them because they are great.
Why WP Rocket?
WP Rocket is the best caching plugin for WordPress and the official partner of WP Engine. Unfortunately, it’s not free.
Can I be totally honest with you?
I was skeptical at first. There are so many caching plugins out there. Most of them are free. And all claims to be the best. Are they?
Picture this:
You’ve tried W3 Total Cache, WP Fastest Cache, and WP Supercache plugins on your site. All 3 of the best free caching plugins for WordPress.
For what it’s worth, they are either not performing as they should be. Or they are hard to configure — especially W3 Total Cache.
Or maybe both.
I’ve been there.
WP Rocket provides tons of features for you to make your website loads blazing fast.
You can go from this:
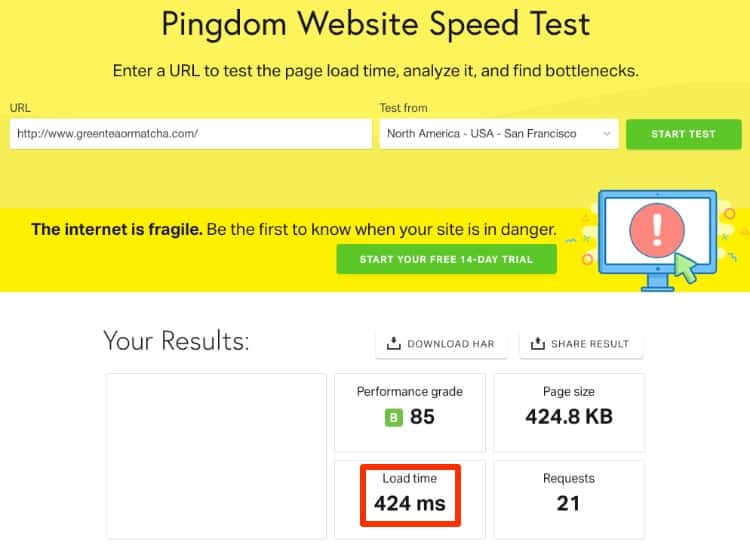
To something like this.
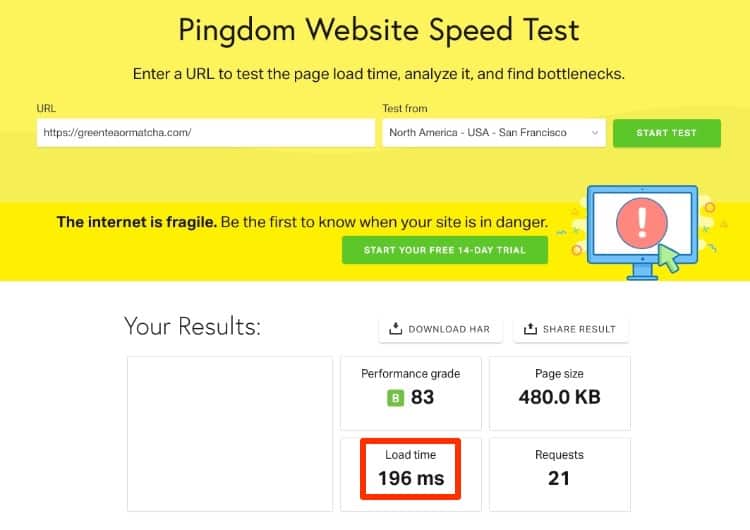
Boom!
WP Rocket reduced page load time by more than 50%.
Want to know the best part?
WP Rocket is so easy to configure — even for beginners — and they do all the hard work for you.
How to Download and Install WP Rocket?
For starters, head down to WP Rocket website to purchase a license.
- Single Plan: $39/year for 1 website
- Plus Plan: $99/year for 3 websites
- Infinite Plan: $199/year for unlimited websites
So how does the WP Rocket pricing work?
You could start off with a single plan and pay $39/year. If you need another license, simply upgrade to Plus plan by paying $60.
You only pay the difference.
Yes, it’s that simple.
Once you purchased a plan, log in to your account to download the plugin.

You could renew your license(s) with 50% OFF. Anytime.
Next, go to your Admin Dashboard > Plugins > Add New. Upload the .zip file you downloaded earlier and activate it.
Now you have WP Rocket installed.
Best WP Rocket Settings
Dashboard and Quick Actions
On the dashboard, you could find your basic account details such as license type and expiration date — WP Rocket gives 50% off if you renew your account. It also gives you the option to be part of the beta testing program.
Definitely useful if you’re a WordPress programmer — like me.
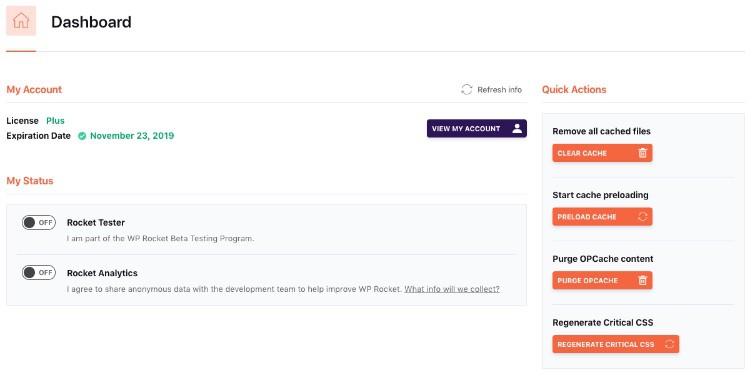
Quick actions display the 4 important actions that you’ll do frequently:
- Remove all cached files — WP Rocket will notify you to clear the cache whenever it detects changes made on the site. Even though WP Rocket will automatically clear the cache for you, it’s still recommended to clear the cache once you’re done with changes.
- Start cache preloading — The crawler will simulate a visit to your site and generates cache for your homepage and all the links found on your homepage. Making sure your visitors always access the fast — cached — version of the page.
- Purge OPCache content — Very useful if something seems wrong with WP Rocket after the update. More info on this below.
- Regenerate Critical CSS — Always regenerate critical CSS whenever you made changes to your CSS.
Cache
In March 2018, Google rolled out mobile-first indexing broadly. It increases the importance of a mobile-friendly website. Fast-loading mobile content becomes one of the many search engine ranking signals.
With Google moving towards mobile-first index. Mobile speed has become increasingly important.
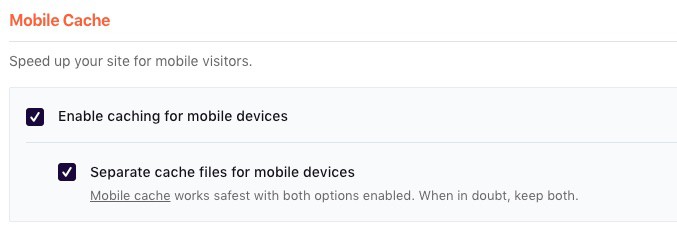
Under Mobile Cache, enable both options. This will speed up your site for mobile visitors — faster mobile load times.

User cache is useful if you have user-specific or restricted content on your site. Something like a membership site where users must log in to view content. If your site doesn’t belong to this category, keep this unchecked.
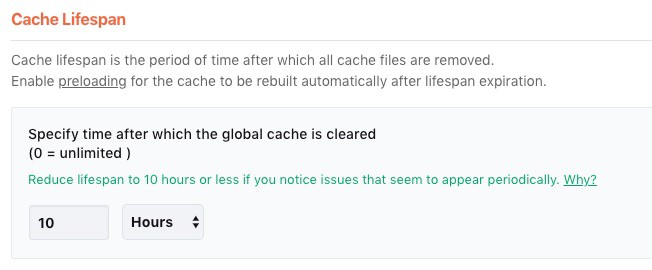
Cache lifespan is a period of time before the all the cache files are removed. Once we enable the cache preloading — which we will — these cache files will be re-built automatically after lifespan expired.
By default, WP Rocket’s cache lifespan is automatically set to 10 hours. Leave it as it is. 10 hours is the magic number. Reducing the lifespan will cause your server to use more resources to keep up with the clearing and rebuild process.
[click_to_tweet tweet=”Best WP Rocket settings for WordPress #wordpress #bloggers #optimization #wprocket” quote=”Tweet this best WP Rocket settings for WordPress”]
File Optimization
File optimization can be tricker than it sounds. It’s one of the biggest cause for breaking sites’ functionalities.
Want to know the best part?
Optimizing files is easy with WP Rocket.
But first a warning:
Changes made to File Optimization settings might break your site. Always test when enabling an option. If it causes an issue, disable the option.
Now:
For starters, enable all options under Basic Settings. While it might not affect your performance directly, removing query strings from static resource will improve your GTMetrix score.
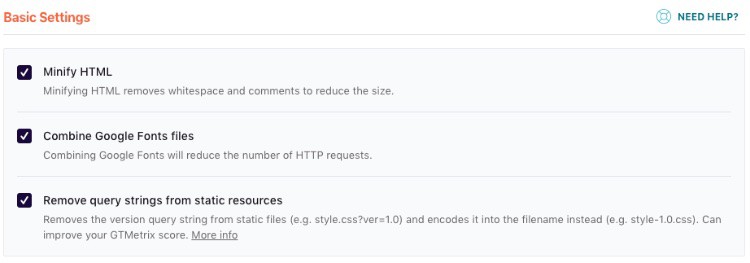
Next, enable minification for HTML, CSS, and JS files.
You’re probably wondering:
“What is minification? And why is it important?”
Minification is a process that removes unnecessary spaces, lines, and characters from the files. It reduces file size greatly. Making them get loaded quicker.
Think about it.
I’ve always used the Autoptimize plugin previously to do these tasks. Now WP Rocket handles these for you, that’s one less plugin to install.
A word of caution:
Enable combining CSS files and Javascript files will depend on your server configuration.
If your server supports HTTP/2 protocol — like mine — you can disable these options. HTTP/2 enables your site to load multiple requests concurrently which is better as it sending multiple requests to load smaller files.
Otherwise, enable the options to combine CSS and javascript files. It will reduce the number of HTTP requests and speed up your website.
Back to what I was saying:
Use this HTTP/2 Test tool to check if your server supports HTTP/2.
CSS Optimization
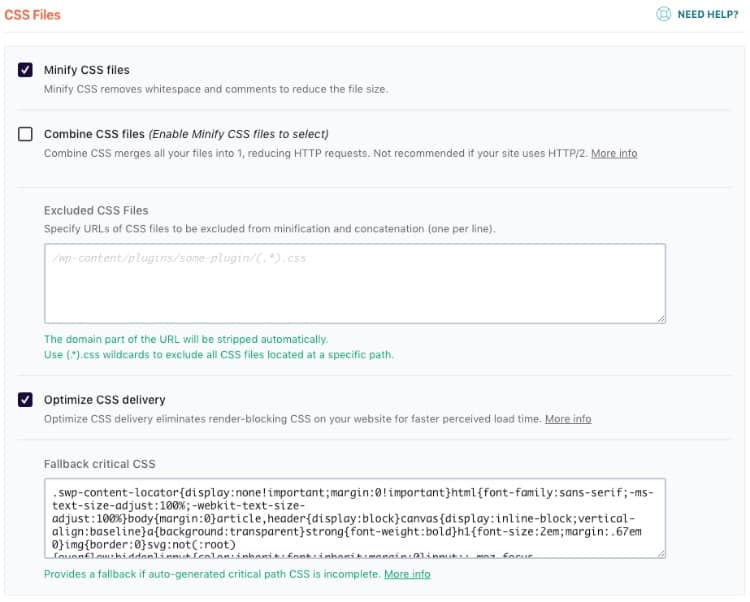
You should enable Optimize CSS delivery (another key feature from WP Rocket).
Why?
WP Rocket will eliminate render-blocking CSS (which you might encounter with Google PageSpeed Insight).
Render-blocking CSS will slow down the loading of your site as it causes the page to wait for CSS to finish loading before showing the page.
Here’s the deal:
WP Rocket generates the critical CSS for you automatically — which is a lifesaver.
Critical CSS is a good chunk of your CSS that’s only needed to show above-the-fold content.
So how do you generate critical CSS if you’re not using WP Rocket?
Before using WP Rocket, I have to generate Critical CSS manually with Critical Path CSS Generator by Jonas Ohlsson Aden. While it works great, it’s very time consuming as I have to repeat the process whenever I make changes to CSS to ensure none is render-blocking. Very inefficient use of time.
If you want to know how to use the Critical Path CSS Generator, let me know if the comment below.
[click_to_tweet tweet=”Best WP Rocket settings for WordPress #wordpress #bloggers #optimization #wprocket” quote=”Tweet this best WP Rocket settings for WordPress”]
Javascript Optimization
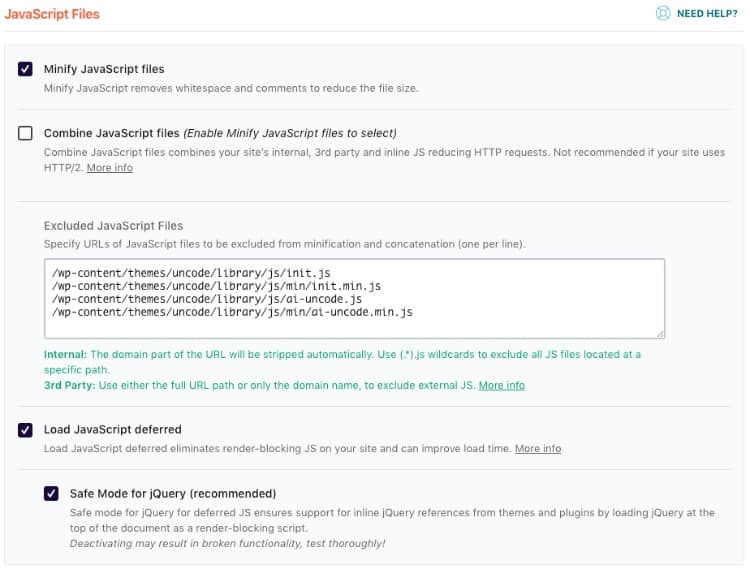
Enable Load Javascript deferred. Enabling this option will ensure all Javascript files on the page will be loaded with defer attribute.
Will this make my Javascript files non-render blocking?
And you’d be right.
The defer attribute tells the browser to finish loading the page before running the Javascript files. No more render-blocking JS issue.

As you could see on the image above, defer ensures your page finished loading before executing the script.
It will improve your page load faster.
But:
Always check your website after enabling this option to ensure everything works as it should be.
Deferring Javascript files is the main cause caching plugin break websites functionality.
If you have any issue, enable Safe Mode for jQuery.
Here’s why:
Most Javascript files rely on jQuery. This option will exclude jQuery from being deferred. Making sure it’s available for other scripts to use.
As it’s different from themes to themes, it’s hard to say if deferring Javascript will work out of the box.
To find out if it’s causing any issue on your website:
- Open the developer tool on your browser
- Click on ‘Console’ tab
- Find any error message in red color. You might want to exclude some files for everything to work perfectly.
Media
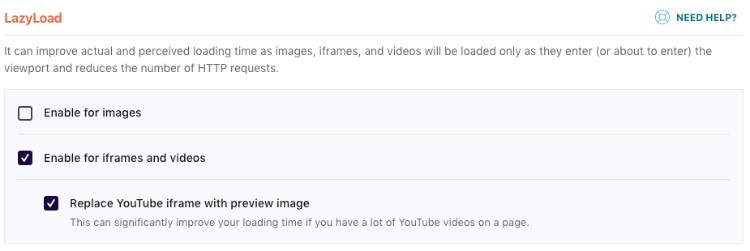
Lazy loading images are optional. I don’t enable it for my site as I use images moderately. But if you’re doing a photography site or displaying tons of images on your site, check enable for images.
It will improve the page load as it only loads the image as they are visible.
So how about displaying Youtube videos on my site?
I tend to embed a couple of YouTube videos on a single post. And embedding videos always slow down your website.
So how do you make your page load faster even with videos?
You could install Lazy Load for Video plugin. It’s similar to images, but for videos.
Now:
With WP Rocket, you could simply check enable for iframes and videos. And don’t forget to enable the option to replace Youtube iframe with a preview image.
Enabling this option will only load the video when the user clicks on the play button. Another easy win with WP Rocket.

Disable Emoji. Emoji works great with messages or even Facebook Ads, but it’s horrible for website/blog. Enabling emoji will slow down your site with less value.

Disable WordPress embeds. This option will prevent others from embedding content from your website. Embedding content from your website would use up your server’s resources and bandwidth and slows down your website.
[click_to_tweet tweet=”Best WP Rocket settings for WordPress #wordpress #bloggers #optimization #wprocket” quote=”Tweet this best WP Rocket settings for WordPress”]
Preloading
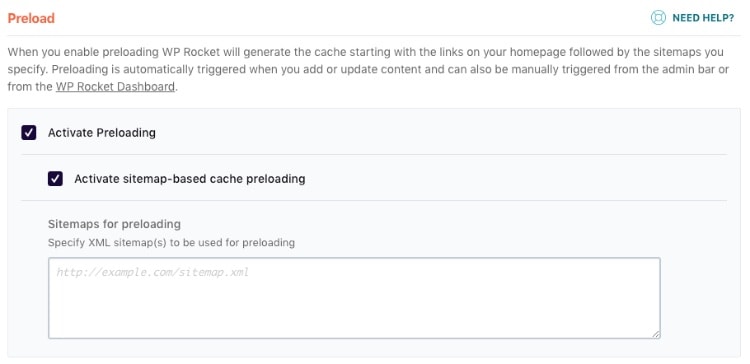
Enable Activate sitemap-based cache preloading. This will tell WP Rocket to preload all the URLs in your sitemap when the cache expired or cleared.
If you installed the Yoast plugin, enable Yoast SEO XML Sitemap. WP Rocket will automatically detect the sitemap generated by Yoast SEO.

Prefetch DNS Requests allows you to speed up page load when you’re loading multiple resources from another website/ domain. It tells the browser to perform DNS lookups for links on the page and resolve the domain name. All these are done in the background as the users are browsing page.
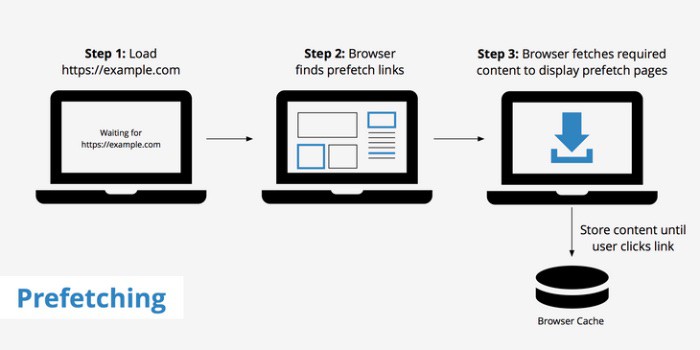
With DNS prefetch, users don’t have to wait for the DNS lookups to take place when they clicked on the link. This minimizes latency down by around 200ms and really speed things up for the users.
This is a list of the common domain names to prefetch:
- //fonts.googleapis.com
- //ajax.googleapis.com
- //fonts.gstatic.com
- //google-analytics.com
- //www.google-analytics.com
- //www.googletagmanager.com
- //www.facebook.com
- //connect.facebook.net
- //1.gravatar.com
- //platform.twitter.com
- //cdnjs.cloudflare.com
- //maps.google.com
Advanced Rules
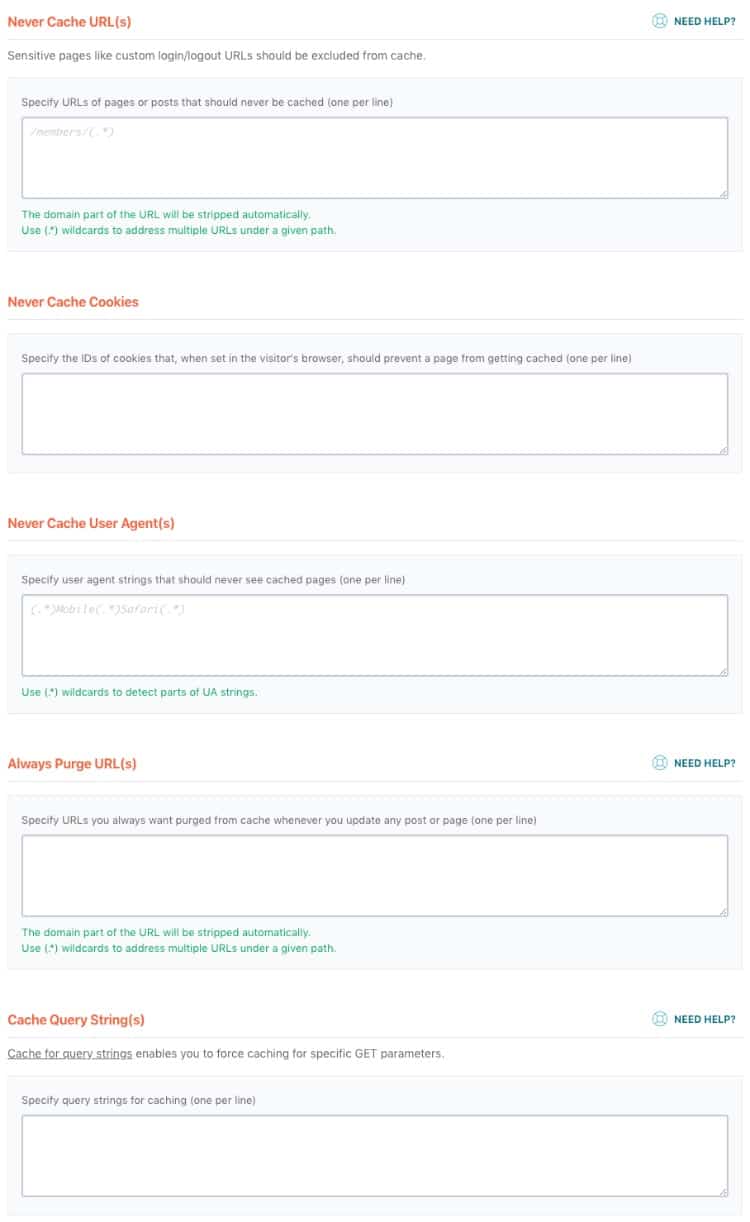
Unless you’re running an e-commerce site or have a very specific requirement in mind, you don’t have to make any changes to this.
Database
You might be wondering why this option is even available?
I do too. The database isn’t related to caching but cleaning your database does speed things up.
Before using WP Rocket, I’ve to install WP Optimize to clean — and optimize — my database. Now, I don’t have to.
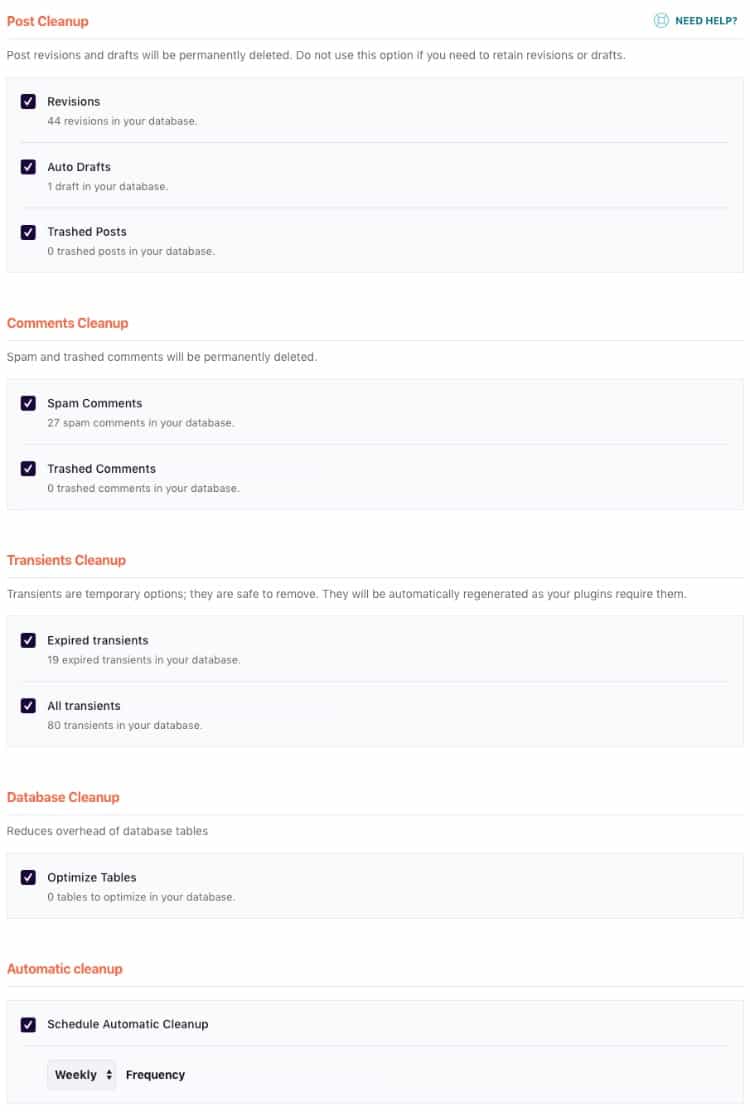
You’ll want to enable all the options here, especially post and comments clean up.
Whenever you’re working on a post, WordPress save all changes or revisions you made in the database and it auto-save drafts too. As your blog grows, so does your revisions. It bloats the database with unnecessary data and slows down its performance.
The same applies to comment one way or the other.
Most WordPress sites received spam comments every single minute. Sometimes you don’t even bother looking at it. But you just forgot to clean it up.
With WP Rocket, not only you could clean up your database, you could schedule it too. Let database optimization run in autopilot mode.
That’s one less thing to worry about.
[click_to_tweet tweet=”Best WP Rocket settings for WordPress #wordpress #bloggers #optimization #wprocket” quote=”Tweet this best WP Rocket settings for WordPress”]
CDN
If you’re using a content delivery network (CDN), you should enable this option. WP Rocket will rewrite all URLs of static files with the CDN CNAMEs you provide.
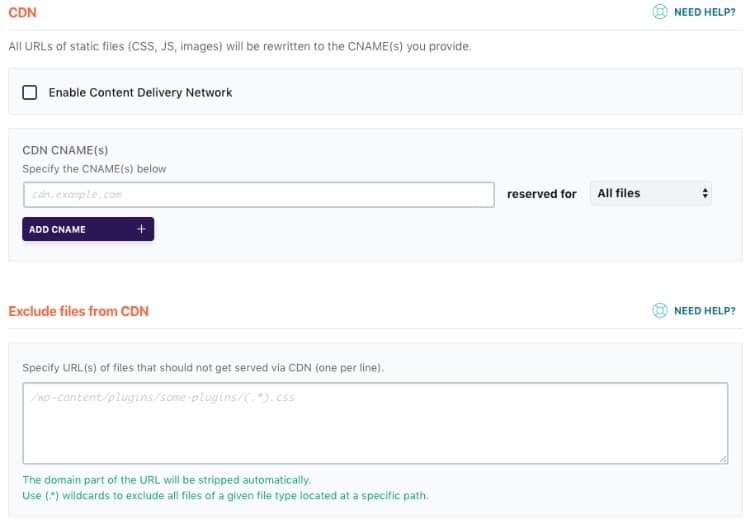
As of now, it supports MaxCDN, KeyCDN, Amazon CloudFront, and others. If you’re using the free Cloudflare CDN — like me, we’ll get to it below.
Add-Ons Cloudflare
WP Rocket comes with built-in integration with Cloudflare.

You could key the following details to authorize the connection.
- Global API Key – The API key for your Cloudflare account.
- Account Email – The email address you use to login to your Cloudflare account
- Domain – the domain name of the website
How do you find out your Cloudflare’s Global API Key and Zone ID?
First off, log in to your account. On your dashboard, scroll down till you found the Zone ID.
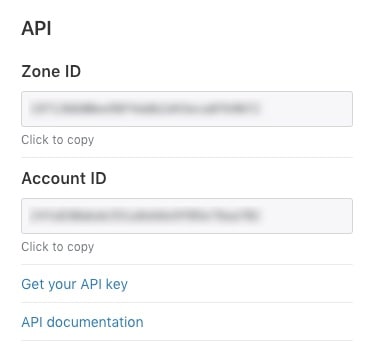
Next, click on “Get your API Key”. And scroll down till you found the Global API key. As seen below.

Turn on Optimal settings. WP Rocket will enhance your default Cloudflare configuration for better speed and performance.
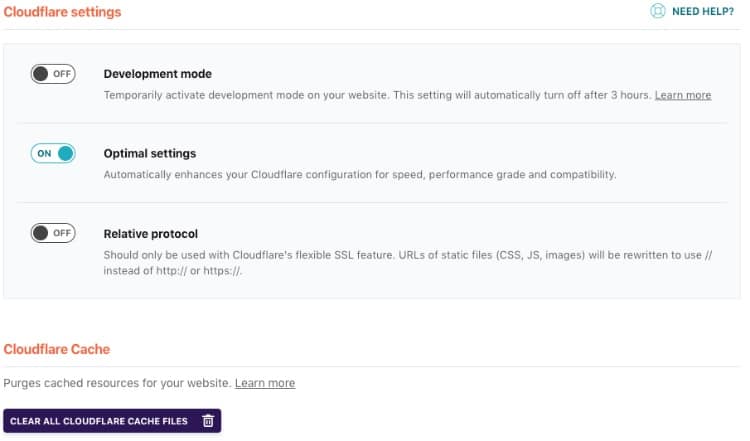
WP Rocket will set the best Cloudflare settings for WordPress automatically.
You could also turn on / off the Development mode of Cloudflare right from your website. Once activated, it will automatically turn off after 3 hours. This is extremely useful if you’re making changes to your site and you want to see it right away.
Enable Relative protocol option ONLY if you’re using Cloudflare’s flexible SSL. If you’re using free Let’s Encrypt SSL, don’t enable this option.
Tools
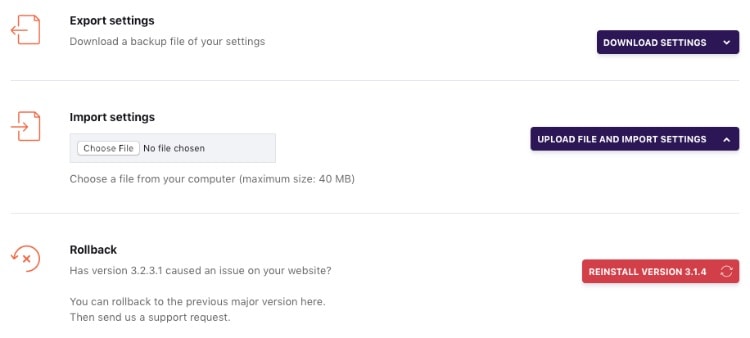
It comes in handy if you bought the Plus plan from WP Rocket that supports up to 3 websites — you don’t have to configure each website manually.
Rollback gives you the option to re-install the previous version of WP Rocket. Extremely useful when the newer version breaks or isn’t working properly.
[click_to_tweet tweet=”Best WP Rocket settings for WordPress #wordpress #bloggers #optimization #wprocket” quote=”Tweet this best WP Rocket settings for WordPress”]
Need help with WP Rocket?
I’ve used WP Rocket on multiple websites and super happy with the performance result. If what you see here looks scary and you need help with it. Let me know in the comment below or contact me here.
Final Thoughts
Let’s recap.
WP Rocket is the best — premium — caching plugin for WordPress. It’s not free but I could vouch for its performance. You could copy the WP Rocket settings that I’ve tested and worked best for me for an immediate result.
However, if you’re looking for the free alternative, there are a couple of free alternative caching plugins you could use.
Let me say this straight.
Caching is important. It improves your page load. And it improves your search ranking.
Whichever plugin you end up using, you have to be comfortable with it.
If you like what you’ve seen so far, click on the link below to purchase at no extra cost to you.
Yuyu
I am a front-end developer and I teaches entrepreneurs who want to grow their audience, start an online business, and pursue their dream life. When I spend time away from the computer, I enjoy reading books and having a cup of green tea.
19 Comments
Add comment Cancel reply
This site uses Akismet to reduce spam. Learn how your comment data is processed.
That is a great article. Today, almost 58% of the websites on the internet are using WordPress. And after the recent Google algorithm change, Google paying more attention to Page load time and mobile-friendly user experience, as an important factor in SEO ranking.
WP Rocket is indeed the best plugin and with the complete optimization configuration, each must read this article. Thanks for sharing.
Thanks, Keyla. I couldn’t agree more.
Wow, i followed all the steps, my site speed like jet.. Thanks a lot
I personally use wp-rocket and it really is the best all-in-one caching plugin out there. I am definitely going to give a short pixel a try.
I agreed. I’ve tried most of the free caching plugins and WP Rocket is the best though it ain’t free.
This is truly is a good post. not saying just to say! very detailed. i have pinned and will be going thru it again.
Thank you, Yulia
Thanks Yuyu, showing each step to configure WP Rocket is really helpful and much clearer than the guidance on their support site. Have just followed your guidance and changing the defaults has helped improve the performance of my website.
Great to hear that Thomas. Awesome.
You are so full of helpful advice Yuyu! Thanks for sharing your experiences and advice with us. Definitely looking into WP Rocket :).
Thank you, Sara.IMO, it’s one of the best investment for WordPress site. Let me know if you need any help.
Wow, this is so detailed and helpful! I’m bookmarking this for later. Thanks so much!
Thanks, let me know if you need any help 🙂
Great reference source. I currently have a Worpress.com site but hope to migrate to a wordpress.org sometime this year.
That’s great. If page speed is ever an issue with your new hosting, I recommend you to invest in WP Rocket plugin.
WP Rocket is indeed the best plugin that decreases the load time. With its complete optimization configuration, I also suggest that to all WordPress webmasters. Good Job Yuyu!
It is, Paul. I kept telling myself if only I made the switch to WP Rocket earlier.
Wow, this is so comprehensive. I’m saving a link to this article for instructions after I get the plugin. I’ve been using SuperCache but now that I’m focusing much more on SEO, I think it might be time to go premium. Thanks for all the great info.
I’ve used SuperCache before and it’s probably my favorite choice among the free options. A premium plugin is a premium for a reason and I could give more than a reason for WP Rocket.
WP Rocket saves me time by not having to configure my blog manually due to the limitation of SuperCache. Yes, I’m referring to you – DNS Prefetching.